Ethereum
During the fall of 2022, the Ethereum network has transitioned from Proof-of-Work to Proof-of-Stake. That is to say that the Ethereum network no longer validates transactions by minors but by validating servers.
This tutorial explains from A to Z how to build your own Ethereum validator to stake your Ether.
ATTENTION: The implementation of an Ethereum masternode is a complex operation requiring investment and specialized maintenance. We are in no way responsible for the poor implementation of your node and/or the loss of your assets.
If you still want to set up your own validator, we strongly advise you to start with the Testnet network before moving on to the Mainnet
To invest seriously in an Ethereum masternode go to bitgen.com
Summary of the tutorial
Prerequisite
Before starting this tutorial, please carefully read the following prerequisites :
-
Provision a VPS server
- NETCUP: Server VPS 6000 G10
- Minimal configuration :
- OS: Linux Ubuntu 18.04+ ou Debian 9+
- RAM: 16 GB
- STORAGE: 2TO SSD NVME
- NETWORK: 50Mbits/s
-
Configure SSH
-
Configure the firewalll
-
Configure GIT
-
Configure Docker
-
32 ETH (or 32 GoerliETH for the Testnet)
0.1 Introduction to ETH2: The merge
The transition from proof of work (PoW) to proof of stake (PoS) better known as “The Merge” is the biggest change in Ethereum’s history. This transition essentially changes the way the network is secured and lays the foundation for the next phase of improvements.
The execution layer
An execution client is an implementation of Ethereum that verifies all transactions in every block, ensuring network security and data accuracy.
The consensus layer
The most notable change in this Ethereum update is the addition of the Beacon Chain which was launched on December 1, 2020 and which today replaces Proof-of-Work mining. This layer coordinates and pseudo-randomly selects block producers in a way that makes it extremely difficult for validators to coordinate attacks on the network.
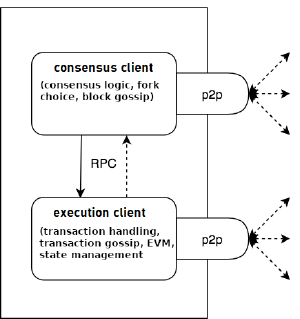
The different clients
All of the following clients implement the Ethereum base specification and are therefore interchangeable
There are four execution clients (EL client):
- GETH (developed with GO)
- NETHERMIND (developed with .NET)
- BESU (developed with Java)
- ERIGO (developed with GO)
There are four consensus clients (CL client):
- PRYSM (developed with GO)
- LIGHTHOUSE (developed with Rust)
- NIMBUS (developed with Nim)
- TEKU (developed with Java)
We will focus here on the deployments GETH/PRYSM & NETHERMIND/PRYSM
For further implementation, do not hesitate to contact us at blog@bitgen.com !
1. Server configuration
Once the server has been provisioned and the prerequisites configured, we will add three new rules to the firewall and retrieve the GIT repository.
Connect on SSH to the server
1.1 Add the rules to the firewall
- Add port
30303(for the execution layer)
> sudo ufw allow 30303- Add port
13000 TCP(for the consensus layer)
> sudo ufw allow 13000/tcp- Add port
12000 UDP(for the consensus layer)
> sudo ufw allow 12000/udp- Validate the configuration with :
> sudo ufw enable- Check that the rules are correctly applied :
> sudo ufw status verboseThe terminal should display the following lines :
    Status: active
    Logging: on (low)
    Default: deny (incoming), allow (outgoing), deny (routed)
    New profiles: skip

    To                         Action      From
    --                         ------      ----
    22123/tcp                  ALLOW IN    Anywhere
    30303                      ALLOW IN    Anywhere
    13000/tcp                  ALLOW IN    Anywhere
    12000/udp                  ALLOW IN    Anywhere
    22123/tcp (v6)             ALLOW IN    Anywhere (v6)
    30303 (v6)                 ALLOW IN    Anywhere (v6)
    13000/tcp (v6)             ALLOW IN    Anywhere (v6)
    12000/udp (v6)             ALLOW IN    Anywhere (v6)
1.2 Retrieve the GIT repository of BITGEN
- Create the base directory and go inside :
> sudo mkdir /validator && cd /validator- Clone the GIT repository:
> sudo git clone https://github.com/bitgenplatform/staking-eth2.git srcThe sources to configure and start your Ethereum masternode can now be found here: /validator/src
2. Create the validator keys
Connect on SSH to the server
- Clone the Ethereum Foundation official
staking-deposit-cliGIT repository which contains all the necessary tools and go inside the folder :
> sudo git clone https://github.com/ethereum/staking-deposit-cli.git /validator/staking-deposit-cli && cd /validator/staking-deposit-cli- Compile the Docker image :
    > sudo apt-get update -y && apt-get install -y make
> sudo make build_docker- Launch the key creation program :
> sudo docker run -it --rm -v /validator/src/launchpad/validator_keys:/app/validator_keys ethereum/staking-deposit-cli new-mnemonic --mnemonic_language=english --num_validators=1 --chain=mainnet- The
--mnemonic_languageoption allows you to choose the language in which the 24 words of the portfolio will be edited - The
--num_validatorsoption must indicate the number of validators you wish to support with this key, here 1 - The
--chainoption allows you to select the target chain,mainnetfor production andpraterfor the testnet - For more option, Read official documentation
When launching the container, a customer journey will start. It will ask you to choose the language in which it will display the questions (in English by default). Validate with the enter key.
Please choose your language ['1. العربية', '2. ελληνικά', '3. English', '4. Français', '5. Bahasa melayu', '6. Italiano', '7. 日本語', '8. 한국어', '9. Português do Brasil', '10. român', '11. 简体中文']: [English]:At the following question choose the password for your validator keys: (write it down on or be sure to remember it)
Create a password that secures your validator keystore(s). You will need to re-enter this to decrypt them when you setup your Ethereum validators.:Once the password is chosen and validated, your 24-word wallet recovery phrase is displayed :
    This is your mnemonic (seed phrase). Write it down and store it safely. It is the ONLY way to retrieve your deposit.


    join input elegant congress lamp laptop youth margin worry slide weird attract surround age marriage prosper romance draw mix where deposit right industry produce


    Press any key when you have written down your mnemonic.
Write down these 24 words and keep it in a safe place !
ATTENTION: We advise you never to copy/paste these words on your computer or to save them online, but to write them down on a physical support using a pen!
The next step will ask you to re-enter these words in order to make sure you didn’t make a mistake during the copy :
Please type your mnemonic (separated by spaces) to confirm you have written it down. Note: you only need to enter the first 4 letters of each word if you'd prefer.Once the 24 words have been re-entered correctly and validated, the program will generate your keys.
                        #####     #####
                      ##     #####     ##
          ###         ##   #######     #########################
          ##  ##      #####               ##                   ##
          ##     #####                 ##                       ##
          ##     ##                     ##                      ###
    ########                        ##                     ####
    ##        ##   ###         #####                       #####
    #                          ##                         # #####
    #                            #                        #  #####
    ##                             ##                    ##
    ##                              ##                   ##
    ##             ###              ##                   ##
    ###############                 ##                   ##
    ###               ##                                 ##
            #############################                    ##
                           ##                             ###
                           #######     #################     ###
                           ##   ## ##        ##   ##    ###
                           ##############          #############

    Creating your keys.
    Creating your keystores:          [####################################]  1/1
    Verifying your keystores:         [####################################]  1/1
    Verifying your deposits:          [####################################]  1/1

    Success!
    Your keys can be found at: /app/validator_keys


    Press any key.
To check the smooth running of the operation, list the files present in the folder :
> cd /validator/src/launchpad/validator_keys && ls -lYou should see a list of files similar to this :
    -r--r----- 1 root root 706 Jun 19 18:41 deposit_data-1655656906.json
    -r--r----- 1 root root 710 Jun 19 18:41 keystore-m_12381_3600_0_0_0-1655656906.json
Your validator keys are now generated !
3. Deposit validation on the Ethereum launchpad
Let’s move on to depositing and validating your 32 ETH collateral.
To do so, go to the Ethereum launchpad: https://launchpad.ethereum.org/en/overview
or https://prater.launchpad.ethereum.org/en/overview if you use the Prater Testnet
Follow the questionnaire (10 questions) by validating with the button CONTINUE or I ACCEPT
Once the 10 questions have been passed, on the Choose execution client screen, click on GETH, then scroll down the page a little to validate.

Once the 10 questions have been passed, on the Choose execution client screen, click on NETHERMIND, then scroll down the page a little to validate.

On the Choose client consensus screen, click on Prysm
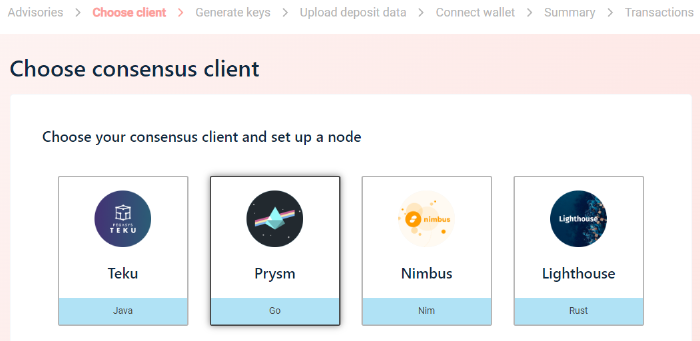
On the Generate key pairs screen enter 1 validator in the field and check the box I am keeping my key(s) safe and have written down my mnemonic phrase then confirm.


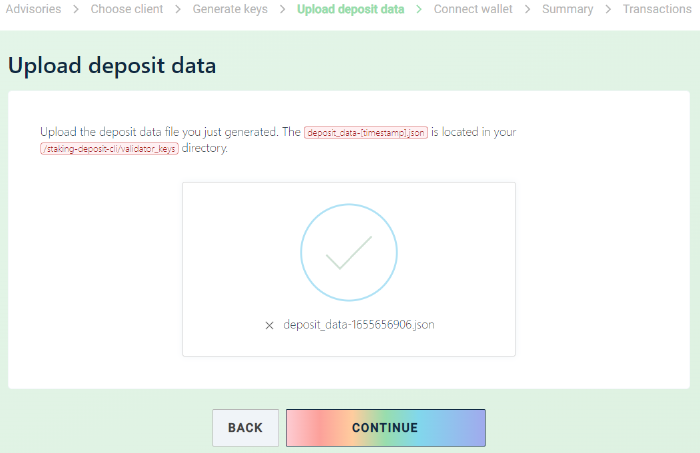
The next screen will ask you to upload your validation key.
To do this, create on your computer a file deposit_data-[timestamp].json which corresponds to the file present in your key directory on the server
> ls -l /validator/src/launchpad/validator_keys/ -r--r----- 1 root root 706 Jun 19 18:41 deposit_data-1655656906.json
-r--r----- 1 root root 710 Jun 19 18:41 keystore-m_12381_3600_0_0_0-1655656906.jsonHere : deposit_data-1655656906.json
Copy/paste the content of the file from your server into that file of your computer :
> sudo cat /validator/src/launchpad/validator_keys/deposit_data-1655656906.jsonThen save your file and upload it to the site :
On the next screen, Connect wallet, select the wallet containing the 32 ETH
On the Summary screen, check all the boxes then click on CONTINUE
On the Transaction screen click on SEND DEPOSIT to carry out the transaction with the Smart-Contract which will collateralize your Ethereum
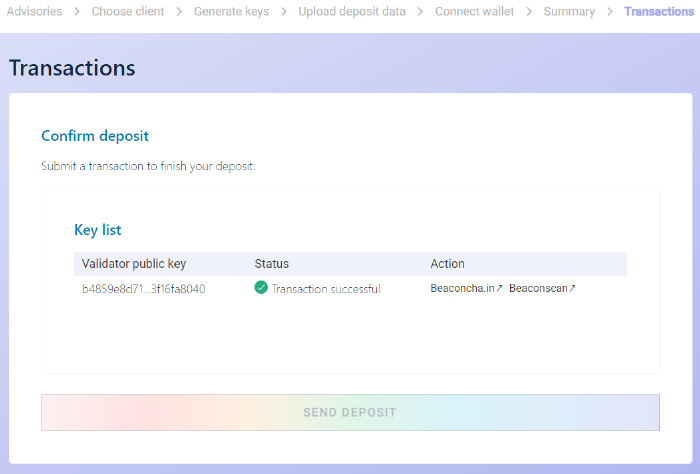
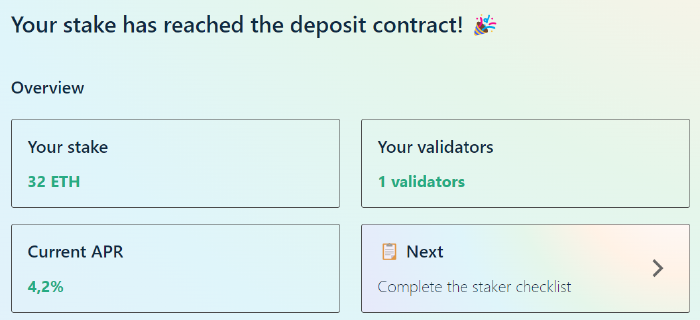
The transfer is complete, click on CONTINUE and if everything went well, you should have the following screen:
4. Configuring and starting the masternode
Connect on SSH to the server
4.1 Edit environment
- Edit the
.envfile
> cd /validator/src/ && sudo nano .envModify the line (only if you are on the Prater Testnet network)
ETH_NETWORK=mainnet
by
ETH_NETWORK=prater
the line (only if you are on the Prater Testnet network)
TARGET_CHAIN=mainnet
by
TARGET_CHAIN=goerli
the line
FEE_RECIPIENT=0x87566dad4Dce9138b8f9D31f486B5dea7a044dd7
by
FEE_RECIPIENT=your_ethereum_address
the line
PUBLIC_IP=0.0.0.0
by
PUBLIC_IP=server_ip
The FEE_RECIPIENT option allows you to add an Ethereum address of your choice. When you participate in the creation of new blocks, the fees will be sent to this address and thus you will increase your validation rewards.
To save with nano: Ctrl+x and confirm with the
ykey then theenterkey
- Now we will generate a key for JWT authentication between our different service containers
> sudo sh -c 'openssl rand -hex 32 | tr -d "\n" > /validator/src/auth/jwt.hex'- Then edit the file
/validator/src/launchpad/wallet-password
> cd /validator/src/launchpad && sudo nano wallet-passwordReplace the line
your_server_wallet_passwordby
the password you chose when creating the keysTo save with nano: Ctrl+x and confirm with the
ykey then theenterkey
4.2 Start the clients (execution & consensus layers)
GETH is the execution client that will link to the Ethereum chain
PRYSM is the consensus client that will make the link with the Ethereum 2.0 chain (beacon-chain) on which the Proof-Of-Stake validators are located
The following command will start both clients: GETH being dependent on PRYSM, the beacon container will also start the geth container
> cd /validator/src/ && sudo docker compose -f run-geth_prysm.yml up -d beacon
To have a visual on the currents operations of GETH :
> cd /validator/src/ && sudo docker compose -f run-geth_prysm.yml logs --tail 50 -f geth
To have a visual on the currents operations of PRYSM :
> cd /validator/src/ && sudo docker compose -f run-geth_prysm.yml logs --tail 50 -f beacon
To access the GETH Mainnet console :
> sudo docker exec -it geth geth attach ipc://root/.ethereum/geth.ipc
To access the GETH Prater console :
> sudo docker exec -it geth geth attach ipc://root/.ethereum/goerli/geth.ipc
NOTE : This operation may take some time (~3 to ~4 days).
NETHERMIND is the execution client that will link to the Ethereum chain
PRYSM is the consensus client that will make the link with the Ethereum 2.0 chain (beacon-chain) on which the Proof-Of-Stake validators are located
The following command will start both clients: NETHERMIND being dependent on PRYSM, the beacon container will also start the nethermind container
> cd /validator/src/ && sudo docker compose -f run-nethermind_prysm.yml up -d beacon
To have a visual on the currents operations of NETHERMIND :
> cd /validator/src/ && sudo docker compose -f run-nethermind_prysm.yml logs --tail 50 -f nethermind
To have a visual on the currents operations of PRYSM :
> cd /validator/src/ && sudo docker compose -f run-nethermind_prysm.yml logs --tail 50 -f beacon
NOTE : This operation may take some time (~8 to ~24 hours).
Clients will indeed download part of the Ethereum chain ! It is necessary to count today not far from 1200Go of storage space for an operational node !
4.3 Attach collateral
Before starting your validator we will have to attach to it the collateral of 32 ETH that we previously blocked in a smart-contract from the Ethereum launchpad site.
ATTENTION: The synchronization of the Beacon-Chain must be completed before validating your collateral ! If you attach the collateral before the end of the beacon-chain synchronization you will be slashed and you will lose some collateral !
To check that the Beacon-Chain is correctly synchronized:
> curl http://localhost:3500/eth/v1alpha1/node/syncingIf the channel is fully synced, you should see :
{"syncing":false}Also check that the two keys are located in the directory /validator/src/launchpad/validator_keys
> cd /validator/src/launchpad/validator_keys && ls -lYou should see a list of files similar to this :
    -r--r----- 1 root root 706 Jun 19 18:41 deposit_data-1655656906.json
-r--r----- 1 root root 710 Jun 19 18:41 keystore-m_12381_3600_0_0_0-1655656906.jsonIf everything is alright, just run the command :
> cd /validator/src && sudo docker compose -f manage-account-prysm.yml run validator-import-launchpadThe terminal will ask you for the password you chose when creating the keys
    [2022-06-25 15:20:27]  WARN flags: Running on the Mainnet
    [2022-06-25 15:20:27]  INFO accounts: Successfully created new wallet wallet-path=/data/wallets
    Enter the password for your imported accounts:
    Importing accounts, this may take a while...
    Importing accounts... 100% [==========================================]  [1s:0s]
    Successfully imported 1 accounts, view all of them by running `accounts list`
To check that your collateral has been validated :
> cd /validator/src && sudo docker compose -f manage-account-prysm.yml run validator-list-accountsYou should see something like this :
    [2022-06-25 15:24:09]  WARN flags: Running on the Mainnet
    [2022-06-25 15:24:09]  WARN validator: You are using an insecure gRPC connection. If you are running your beacon node and validator on the same machines, you can ignore this message. If you want to know how to enable secure connections, see: https://docs.prylabs.network/docs/prysm-usage/secure-grpc
    (keymanager kind) local wallet

    Showing 1 validator account
    View the eth1 deposit transaction data for your accounts by running `validator accounts list --show-deposit-data`

    Account 0 | largely-relieved-koala
    [validating public key] 0x8c1b209f842221a8f9e65fe100524cac137974543145c13ceca61c50d71e870e26d85333772107f3a8502c67e9edf290
This last line will tell you the public key of your collateral.
Write it down, we will need it later on beaconscan.com
4.4 Start the validator
We finally arrive at the final stage of setting up an Ethereum masternode !
The next command will start your validator !
> cd /validator/src && sudo docker compose -f run-geth_prysm.yml up -d
To have a visual on the currents operations of your validator :
> cd /validator/src && sudo docker compose -f run-geth_prysm.yml logs --tail 50 -f validator
> cd /validator/src && sudo docker compose -f run-nethermind_prysm.yml up -d
To have a visual on the currents operations of your validator :
> cd /validator/src && sudo docker compose -f run-nethermind_prysm.yml logs --tail 50 -f validator
Et Voilà ! Your validator is now ready to validate its first transactions !
However, your validator may take some time to start. Indeed it is placed in a queue (counting in EPOC) and will be really active once the queue is finished.
Read the rest of this tutorial to learn how to monitor your validator and your rewards
5. Exiting the validator
Connect on SSH to the server
- Edit the file
.env
> cd /validator/src/ && sudo nano .envModify the line
PUB_KEY=""
by
PUB_KEY="%public_key%"
%public_key% is the public key of your validator retrieved in the previous steps (4.3 Attach collateral)
To save with nano: Ctrl+x and confirm with the
ykey then theenterkey
Then run the command :
> cd /validator/src && sudo docker compose -f manage-account-prysm.yml run validator-exitYou should see something like this when the operation went well :
validator-exit  | time="2023-04-19T16:58:32Z" level=warning msg="Running on the Mainnet" prefix=flags
validator-exit  | time="2023-04-19T16:58:32Z" level=warning msg="You are using an insecure gRPC connection. If you are running your beacon node and validator on the same machines, you can ignore this message. If you want to know how to enable secure connections, see: https://docs.prylabs.network/docs/prysm-usage/secure-grpc" prefix=validator
validator-exit  | time="2023-04-19T16:58:32Z" level=info msg="Voluntary exit was successful for the accounts listed"
6. Go further
6.1 The website beaconscan.com
The beaconscan.com site will allow you to simply monitor your ETH2 validator.
Enter the address https://beaconscan.com/validator/%public_key% in your internet browser
%public_key% is the public key of your validator retrieved in the previous steps (4.3 Attach collateral)
If you have several validators, you can create a free account to access a summary dashboard grouping your nodes.
6.2 Official clients documentation (GETH / NETHERMIND / PRYSM)
GETH => https://geth.ethereum.org/docs
NETHERMIND => https://docs.nethermind.io
PRYSM => https://docs.prylabs.network
6.3 Discount coupon for BITGEN
Use the promo code: STAKING-BLOG-2023 to enjoy 10% discount on your next purchase, valid on masternodes / staking / savings books.
To take advantage of the promotion, visit https://bitgen.com